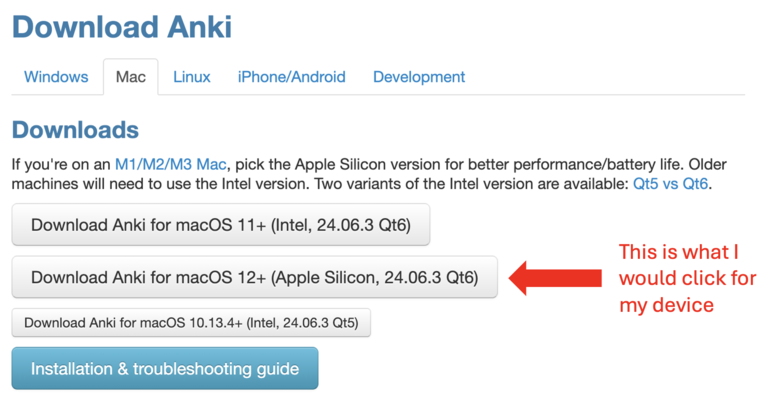
Step 1: Download Anki
- If you haven’t already, Click Here to Download Anki (it's free).
- On the website, simply click the large Download button at the top, then choose Download Anki.
- Be sure to select the correct version for your device to ensure it works properly.
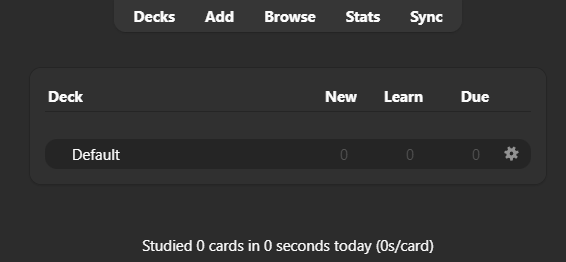
Step 2: Ensure Anki is Downloaded Properly
- Once Anki is successfully downloaded and opened, it should look similar to the image below.
- Congratulations, you now have a powerful learning tool at your fingertips!
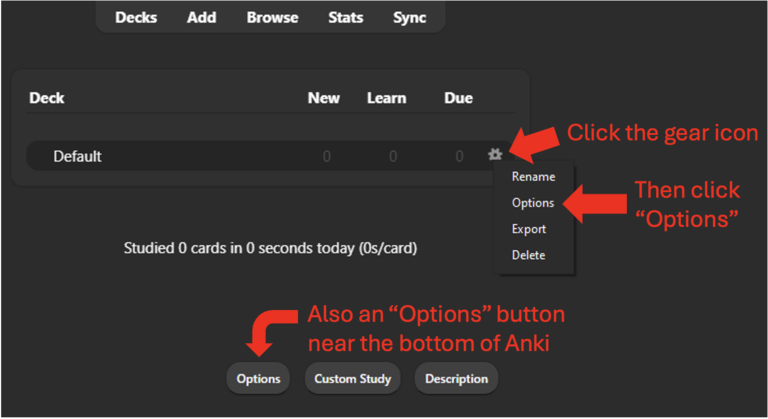
Step 3: Open Anki's Options/Settings
- Open the options menu by clicking on the gear icon on any Anki Deck and then selecting "Options"
Step 4: Adjusting the Options/Settings
- Trying to find the perfect options/settings can get confusing so we recommend you copy our settings for easy optimization.
- If something we recommend does not work for you, feel free to change these values and make them better suited to your study needs.
- If you want more information on any of the following options, click here to be directed to the official Anki Options Manual.
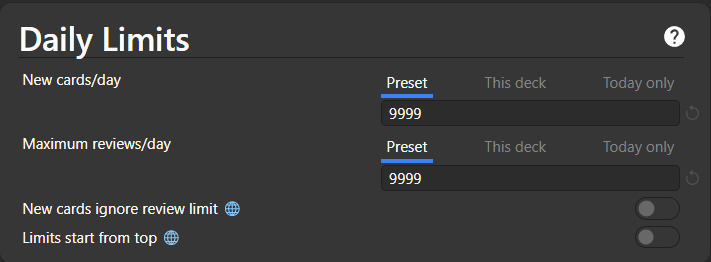
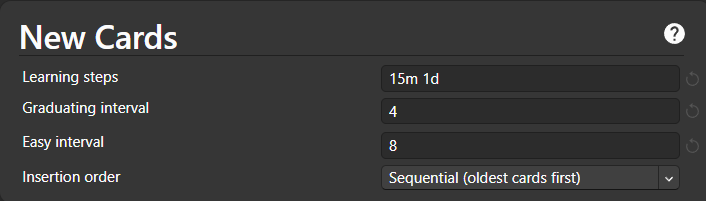
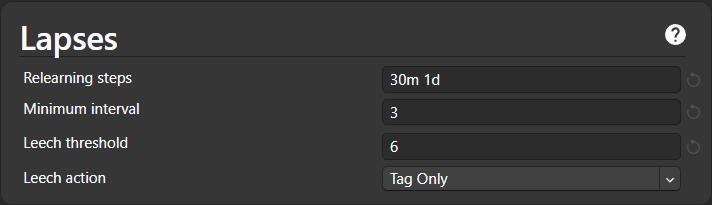
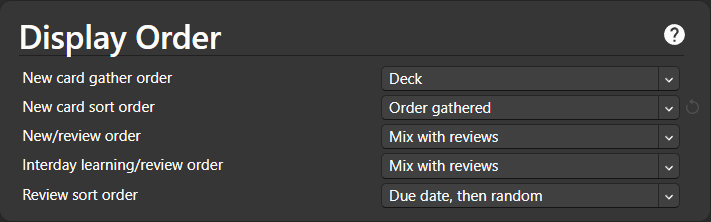

- If using a Premade Anki Deck to study for a class, we recommend keeping all the Burying options off as it might prevent you from seeing some Anki cards in time for your exam(s).
- If you feel comfortable enough with Anki, you can experiment with these options to see what works best for you.
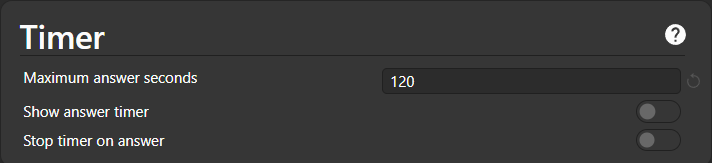
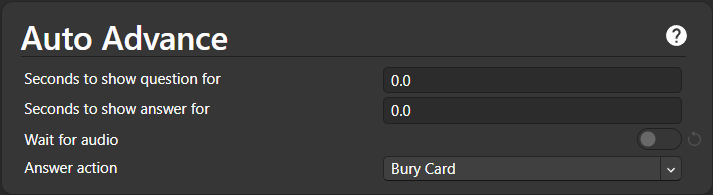
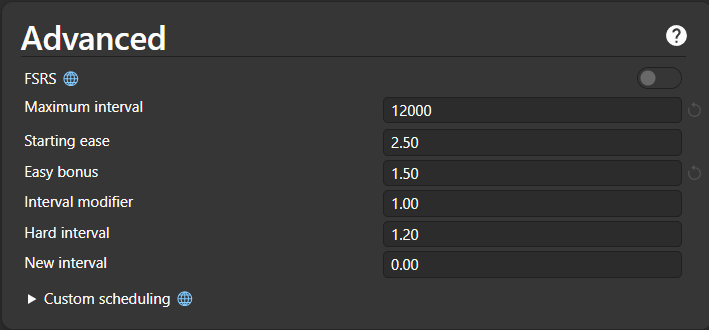
After editing all of these options, be sure to click Save at the top.
(Optional) Step 5: Adding Image Occlusion Enhanced
- Looking to turn images into interactive flashcards? The Image Occlusion Enhanced add-on for Anki allows you to cover parts of an image, helping you test your knowledge in a more dynamic way. This tool is perfect for visual learners and those studying complex diagrams.
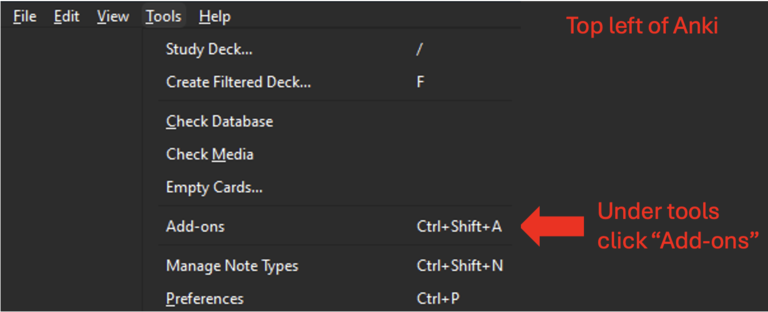
- How to Install Image Occlusion Enhanced
Follow the steps below to add this powerful tool to your Anki deck:- Open Anki and go to Tools and select the Add-ons menu.
- Click on Get Add-ons and enter the code provided below.
- Restart Anki, and you're all set to start creating image-based flashcards!
- Image Occlusion Enhanced Code: 1374772155


Start Your Studying!
- Now that your Anki setup is optimized, you’re ready to start studying!
How to Begin Studying with Anki
- Create Your Own Flashcards: For tips on how to make effective flashcards, check out our guide on Creating Effective Flashcards With Anki.
- Download Premade Anki Decks: Save time by checking if your class already has a premade Anki deck. Head over to our Premade Anki Decks page to find materials tailored toward a specific course, so you can start studying right away without the need to create your own flashcards.
Using Anki for Study Sessions
- Once you’ve selected a deck, studying is simple:
- Front/Back Cards: Press the space bar to flip the card and view the answer.
- Cloze Deletion or Image Occlusion Cards: Press the space bar to reveal the hidden or occluded information.
Grading Your Answer
- After you view the card (spacebar), Anki will ask when you’d like to review it again. You can choose from the following options, based on how difficult you found the card:
- Again (1 key): Select this if you got the card wrong. You’ll see it again soon.
- Hard (2 key): Choose this if the card is very challenging.
- Good (3 key or space bar): Use this if you answered the card correctly.
- Easy (4 key): Use this if the card is very easy. This option has the longest review interval.
Stick with the System
- To get the most out of Anki, try to review your flashcards daily. Anki’s spaced repetition algorithm will help you retain information longer, reducing the need to re-learn material. The more often you review, the more spaced out the cards will become, saving you time in the long run.

Still Need Help?
- Feel free to reach out to us at studyhawkiowa@gmail.com if you have any questions, comments, or concerns.
- Additionally, we recommend checking out a tutorial on YouTube for a step-by-step guide if you're still unsure how to use Anki.